

Now that all key holes are drilled, I can also drill the in-between holes at the front top fuselage side. These are a little tricky as they need to be inline with the holes on the F-709 bulkhead.
I made two lines from the center of the hole on the skin of the fuselage and measured a 5 inch reference point on both lines. Then reinstalled the fairing and extended the lines. The intersection is the correct location and as double check I measured the 5 inch back and set a drill mark point.

Drilled #40 and all the location turned out very well.

Did the same thing on the other holes along F709 and up-drilled to #30

I trimmed the forward edge of the fairing a tiny bit so that it ends in the middle of the leading of the horizontal stabiliser.

Repeated the process on the passenger side. I still need to trim the forward edge on this side. I slightly heated the forward edge and could massage it so that the fit is good now. If things need to look perfect and I have lots of time at hand, I would add some epoxy underneath and sand is smooth, but hey... this is an amateur build... and perfection is for those that are already retired or want to win a building price. I'm in neither one of those categories.

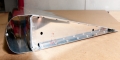
Clecoes installed and a view from the top. You can see here that the forward edge on the vertical stabiliser fits snug.

Next, I drilled the nutplate ear holes on the vertical stabiliser bottom.

Also drill them on the horizontal stabiliser. Here the last one is a one ear nutplate.

The forward side of the horizontal stabiliser reveals a design flaw. The hole for the screw is in the pre-drilled location, so there is no way I could have messed this up myself. But drilling the nutplate ears, you can see that it's right on the edge of the forward tab op the side rib of the horizontal stabiliser. This is off course not structural but its's not pretty.

Same on the other side. I've been told by support to dimple, rivet and forget about it. And that's just what I'll do. I may also curse a bit while doing it...


