

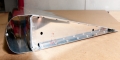
Now that all to top and bottom row holes are drilled to the existing holes in the stabilo's, I can start trimming the end of the fairing to be in line with the vertical stabiliser and the lower fuselage end.
The easiest way to do this is to clamp a steel rules along the edges and draw the straight line that connects the two parts.

Close up view.

With this black line made, I extended the line to the blue sharpie line which is the full cut off line.

In the below image, the excess is trimmed off and sanded. I also updrilled the #40 holes to #30 with a reamer.

Next up is drilling the holes in the fairing towards the bottom end of the fairing. The idea here is to drill and attach the fairing with a #6 screw in a tapped hole in the longeron.
First mark the location on the longeron where you want the hole to be taking into account edge distance. Then use the same technique as in the previous article to draw a perpendicular line and mark a distance. I used 6inch as a good distance as it's passed the inspection plate. I kept the inspection plate in place to get the situation equal to how it will be in the final installation.
Some more fairing material will need to be trimmed up once the holes are drilled.


