

Today was the first rivetting day. The training pieces require rivetting of some flush head rivets, solid rivets and pop rivets in 3 and 4 / 32 diameter.
The 3/32 have to be backrivetted. The others are done by using the rivet gun.
In the next picture, I'm having some fun with the mushroom flush rivet set and a bucking bar setting the 4-4 flush rivets. These are actually more difficult then I expected.
They turned out pretty well but I saw later on that the plate and angle do not fit really perfectly. I think it better to do this with an extra clamp on the outside and manually squeezing.

I have some rivet gauges but even with them, I'm still not sure if all are fine. Looking at the gauges, I think they are but feel free to comment using the close-ups below.
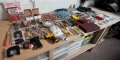
Next picture in foreground shows the AD3-4.

Here are 2 solid rivets AD4-4 on the outside and 2 pop rivets on the inside

And some more AD4-4 solid rivets (3 left) and 1 flush 4-4 on the right.

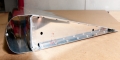
This it a picture of the gauge measuring of an 1/8 rivet, fits perfectly in the gauge. I assume this is perfect.
Although in some of the internet movies, the always overdrill a bit so the diameter is just too large to fit in the gauge.
Update 11/12/2011on the rivet sizes : In general, it is more important to maintain minimum gauge requirements for the set rivet then reaching the entire diamter of the gauge ring. If you set the gauge vertically next to the manufactured rivet head and slide it towards the head. You should have a bump up the rivet. It should not slide over. Measure this in all 4 directions of the head. If you are over the cut-out of the gauge everywhere. Your are going to be fine. EVEN IF the manufactured head did not read the 1.5x diameter and doesn't fill the ring. Again: for strength, remaining gauge is more important then the diameter. The whole rivet sets itself or 'expand' in the hol. If the drilled hole was slightly enlarged or rivet length a bit short, you may end up with a shop head that is not wide enough in diameter. Make sure you get the gauge right, the rivet is squeezed inthere anyway fixing the entire assembly together.

This is the result of the piece. I will also fill up the 4-4's in the overlap piece if after the real training project I have some rivets left.


