

I asked my local tyre-shop to assemble my inner and outer tyres on the wheels. I initially thought you need some serious machinery to get the tyre on.
Another proof that you should first real the manual carefully before doing something !
The wheel splits in halve and it's actually quite easy to install the tube and outer tyre over the axle.
After reading the manual, found out that the red dot on the tyre should align with the inflation tube of the inner tyre, which of course the tyre-shop guy didn't know.
So I disassembled the wheel halves again and did it myself. One tyre went fine.
On the other one, I discovered that the guy actually pinched the inner tyre between the aluminum wheel halves leading into a broken inner tyre... grrrr... will need to order a new one at spruce.
There is a trick in the manual to pinch the outer tyre together with 3 clamps.
What I did was inflate the tyre a couple of times to 20psi as stated and then let the air out. When the air is out, you can easily push the outer tyre down and visually see that the joining point of the two halves is free. When ready inspecting, put the bolts in and torque to 100inch/lbs.

Anyway, stuck on the wheels...
So decided to move on to the parking brake. There are as many variaties as there are builders as to how to install the parking brake and the instructions are non existing except for a parts drawing delivered with the matco parking brake valve.
I liked the way Dan Checkoway did it using a mount bracket on the firewall and close to the top forward fuselage ribs.
The rib serves as a support point using an adel clamp for the cable and the parking brake is close underneath.
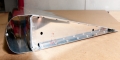
Made a bracket from stock .040 material

Drilled the part on the firewall.

Top down view. The cable will run forward obviously but just wanted to check the alignment of the push cable with the brake valve. I have installed 2 K1000-3 nutplaces in the back and 2 AN3 bold hold the parking brake block in place.

Forward view. The cable pushes or pulls the handle on the valve. The bottom connectors will recieve AN816 NPT pipe thread to nipple connector which will run to the brake line passthrough point on the bottom of the firewall. But off course, I'm out of AN816 so another setback. On the top of the brake, I will install AN822-4D elbows so that the hoses from the master brake cylinders from the pedals are easy to connect. This was another reason to install the parking brake in this location. It's gonna be easy to connect the lines from the pedals to the parking brake valve in this way. I had previously bought the TS-flightlines custom brake lines which look much nicer than the nylon tubing.


