TitleGarrison

No bird ever flew nonstop from New York to Tokyo, or raced 15 miles high at triple the speed of sound.                                                                                                   
  But birds do something else.
  They do not conquer the air; they romance it.
.”

  Peter Garrison

HoursAndCounting

Jur's RV7 Aircraft Factory
2917 hours
and counting
Some decisions in life are bare of any obvious logic


Installation of pilot side landing light continues. I finalised that cutout and sanded it smooth.
The next step is to protect the landing light with masking tape and then slide it into place using the two set screws on the inner corner.
Be carefull doring this, The ears on the landing light are in plastic and not very strong.

The next procedure is to sand away more material from the contour until the landing light can freely move and kind of floats in the gap just supported by the two inner ears and a single connection point in the wing tip outer corner.
The size required around the perimeter is close to the thickness of a card or business card. I used small carton cards to slide between the lamp and epoxy to check for clearance. It 's a process that requires patience.

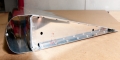
 First cut out complete, next wing tip ready for the same work.

 Applied the template other side and traced the perimeter with a sharpie. Surprisingly, using the same template, the upper edge clearence on the passenger side is more liberal. That means there must be some small differences in the molds of the wingtips.

Same procedure of installation on the passenger side. My cutout on the inner side is a bit liberal but I will live with it. If I have a lot of patience and time left, I may fill it up with some epoxy later but I doubt it is worth is.

 This is the inside look with the screws installed. The light floats inside the gap and is support by the two screws. and a single tab on the outside. The screws allow the lamp to be tilted slightly up or down.

 Left wing also close to done.


How to use

Use the kit buttons in the top ribbon bar to see a chronological overview per sub section per kit. For the full chronological article list, see chronological build link in prelude menu here below. The easiest way to lookup information is by typing in some part numbers or keywords using the search option in the ribbon bar


Caution !

Some advice on reading my log for fellow builders !

In some articles, I made corrections at later date on the original article to rectify my own stupidities or faults. Read through the entire article if you intend to use my findings/experiences on your own project !

Social Networking

Share This

Legal Mumbo-Jumbo

It’s possible (not likely) that I’m not as smart as I think I am. (Occasionally, I have moments when I know this to be true. Fortunately, the feeling passes quickly.) Although I have tried to make this information as accurate as I can, it is not only possible, but also quite likely, that erroneous and misguided information lurks within these pages. I cannot and do not warrant these pages to be error free and correct. Furthermore, I accept no liability for the use of this (mis)information. And, as many would say, your mileage may vary. If, after reading this, you are intent on proceeding, please be aware that the contents of this site are protected by copyright (copyright © 2011 and 2012). Nonetheless, you may copy this material subject to these two conditions: (1) any information used is for non-commercial purposes, and (2) the source of the material is properly credited. Of course, you may link to any page herein. At some articles, snippets of the plans from Vans are visible. These are for educational and illustrations purposes only and should never be used as plans for part construction or assembly as plans may have changed since the picture was taken and more important they are protected by Copyright by the Vans Aircraft Mothership company.

JSN Megazine is designed by JoomlaShine.com