

I remember a visit to another builder who was fitting the center empennage fairing. At that time I was still building the wings and at that time I though the building was almost complete when you started fitting the empennage fairing.
Well, meanwhile it's my turn to fit the empennage fairing but I do realize that I am very far from ready. 90% done, 90% to go...
Another thing I remember is that the guy was frustrated about the poor fit of the delivered fairing and having difficulty to have a nice thight fit.
I took my time to test fit this multiple times before actually starting to drill holes. It took me some evenenings with trial and error to figure out what would be the best way to get a snug fit.
I have to say that my fairing fitted fairly well. I can't really complain about the preshaped part. The only place where some help is needed is on the passenger side front of the horizontal stabilo. There the fairing was not snug with the skin but with little pressure as you see here with my thumb, I could get it pretty close to fitting perfectly. It will be a matter of holding it thight there when drilling the holes. I have seen many fairings on other RV7's where the line along the vertical stabilo or along the horizontal stabilo is showing some curtaining or not sitting snug to the empennage. I did file a bit of material of the forward top side of the epoxy where it hits the vertical stabilo front in order to have the hole thing move down more and give a better fit at the horizontal stabilo.
So far it looks good on mine, so I decided to move on and start drilling.

Now the big question is, how to drill the holes in the epoxy without seeing the holes which are already defined underneath. I had to drill out some rivets from the top skin of the horizontal stabilo as I forgot to leave these open 13 years ago when I rivetted the skins on the horizontal stabilizer. The method I used to define the holes was to draw perpendicular lines from the holes and then measure an offset line, all at equal distance. When the epoxy is in place, all I have to do is carefully measure the same distance parallel to the perpendicular lines from the offset line.

I also have drawn the contours on the top fuselage skin and on the front of the vertical stabiliser. You can play a bit with the height of the fairing on the vertical stabilo but it will have a result on the sides of the fairing as well.
It's kind of an artistic decision to get the best fit. Carefull measuring is key here. Take your time. The more accurate the lines and disctances are, the less risk of misaligning the drilled holes. If you missdrill the first holes, the fairing will slightly move and pull itself in the hole but the alignment will be off and you will start getting gaps or curtaining along the long edges.

Placed the fairing back on the empennage and checked the alignment. Clamped it in place and forced the front down a bit.

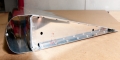
Next, I extended the line on the fairing and carefully measured the distance. Next mark the drill point. I used a smaller size drill bit first to make a test drilling and checking that the whole is aligned with the hole underneath. The alignment worked out perfect and could updrill #40 and cleco. As the passenger side forward hole is the most "unwilling" to stay in place, that's the place where I started (you can see I also used some duct time to keep it in place).

Close up image of the drill point

The next image has some of the critical and defining positions drilled and clecoed.

And some time later, the hole empenage is drilled #40.
Needless to say that I am so far very pleased with the outcome and alignment of this.


